Tuesday 18 September 2012

0 Advantages and disadvantages of using Antivirus Software

Nowadays, nearly every computer user is using an antivirus software. The usage of antivirus software is going up day by day as internet keeps becoming less safe compared to before. Compared to past years, there are more viruses, spywares, worms, trojans and all kinds of harmful stuff going around the internet which you -soon or late- might be a victim of. There are many advantages of using an antivirus software since it makes up for your mistakes, (for example a file which you shouldn't have executed, or a website which you shouldn't have clicked) keeps your computer clean and so on. Antivirus software, like anything else, come with disadvantages as well. The main reason I'm writing this article is actually to show the disadvantages of using an antivirus software, since many users seem to ignore the fact.

To list the advantages in a detailed way:

1) Virus Protection: It will protect your computer from being infected by viruses and many other harmful malware. An antivirus software may save your operating system from crashing, your data from being corrupted or deleted, your computer performing poorly in general and other things.

2) Personal Information Protection: There are hackers out there who want to make quick money by taking your credit card information, or your bank information. This is even more of a serious blow compared to your computer crashing since it could end up with you losing all the money in your credit card or your bank account. Many antivirus software come with an integrated firewall which will protect you from being target of such attacks.

3) System Information: If you think there's something wrong with your computer at any point, you can run a scan with an antivirus software to check if a virus is causing the problems which you're experiencing to be on the safe side. Without one, it will be hard to know if a virus is the source of your performance problems or something else.

And now, the time has come for my favorite part, the disadvantages:

1) Cost: It will cost you a lot of money to buy. You will also be required to pay a monthly or yearly fee to use it which is icing on the cake.

2) CPU & Memory Hogging: Nearly all antivirus software will hog your computer's resources, which means that it will be using unneeded memory and processor speed even though it's not doing anything. The reason behind that could be either the fact that the software is coded badly, or the company has the intention to show their software is "working", even though it isn't.

3) Failure Chance: There's always the chance of antivirus software failing to delete or disable a certain virus. If all viruses were successfully deleted, then noone would be bothering to code new viruses all the time. If you go on a software forum with a virus deletion board, you will see lots of threads with people complaining about their antivirus software not being able to delete a certain virus.

4) Conflicts: Your antivirus software may conflict with another software, or with your drivers, which will mostly end up with your antivirus software not working until you remove that particular software, or vice versa. In some cases you can expect your operating system not to boot.

As you can see, it comes with many disadvantages along with the advantages it brings. When we take a close look at the advantages and disadvantages, the first thing which comes to my mind is the fact that with a little bit of awareness, nothing will happen to your computer or you even if you don't use it.

To be infected by a virus on the internet, you actually have to click something which will harm your computer. None of the really harmful viruses which will crash your computer or slow it down will come to you just by going around the internet. You might end up picking little spywares about advertisements and stuff, but that'd be all. Then again, you can clean your computer from spywares by using a spyware cleaner, which is mostly free and won't hog your resources.

Personally, I have never been a fan of using an antivirus software, and I never used it in my life. My accounts never got hacked, my OS never got crashed beyond repair, and my computer was never slowed down to the point where I can't use it anymore. I can say that I've never been infected with a serious virus.

I believe that if you look out for yourself and be careful on the internet, there's a really rare chance that you will be infected with anything serious. (it's not hard, really) Even Windows has an integrated firewall now which will at least protect you from hacker attacks and all the personal information stealing I've talked about earlier.

Many people say that using an antivirus software is good and necessary for a home user, but advanced users mostly find it unnecessary to use it. I say that every user who is just a little bit careful while surfing the internet won't need anything to protect themselves from harmful viruses. Don't click dodgy websites, don't open dodgy files, and if you're in doubt (happens to best of us), use an online file scanner, use a Virtual Machine, be creative. Don't let commercial software take your money and your computer resources!

Saturday 15 September 2012

0 Online Backup Advantages & Disadvantages

Hello everyone! In my last post, I talked about making a hard drive backup locally, which means backing your files up on something you have physical access on, such as an external hard drive or a secondary hard drive. Today, I will be talking about online backup and its advantages & disadvantages compared to a local backup.

Online backup (which also goes by the name cloud backup) is a service provided by many companies nowadays, which allows you to copy your files over to their servers in order to backup your files. But why would you pay for online backup when you can simply backup your files on your own?

Let's see the advantages of making an online backup.

1) Online backup provides a 256-bit encryption, which means noone can touch your files unless they use the encryption key for your files, and you should be the only one who has the encryption key.

2) You have online access to your files anytime and anywhere. If you need to use your files in a regular basis, instead of carrying an external hard drive around, you can simply access your files via the file server whenever you want to.

3) The data is usually compressed when you backup your files to an online servers, which means they will be less in size overall. That saves you from buying more backup space, and also allows you to download your files in a faster fashion.

4) After the initial backup, the online backup method is actually faster than local backup unless you own an expensive software, since many companies use a method where only the changes in a file is uploaded to the server rather than the whole file itself every time. So if you have a file of 100MB, and you increased it to 120, only the 20MB part will be copied to the server, saving you time.

5) Scared of your electricity going off or something? You can choose to have real-time backup, which sure drains your computer's resources more than a scheduled backup, but this way, your files will be copied to the server as soon as you have made a change to them, preventing you from losing anything at all.

Of course, with all the good things we listed, there are some disadvantages to online backup.

1) Since the only way you can restore your data is over the internet, if you are in a situation where your download speed is slow, you have bandwidth issues, or you have issues connecting to internet in general, then there's no way you can access your backup at that particular time. (Some companies offer to send you a disk with your backup in it.)

2) If you lose your encryption password, your files are gone forever. There's no way that you will access your files without your encryption password, except if your backup company provides managed backup. In that case, losing the password shouldn't be a problem.

3) If you have too many files you have to copy, and a slow upload line, then it will take you limitless amounts of time to back your files up. So, if you are planning to store terrabytes of files on a cloud server, maybe you should think about going back to local backup.

4) There's always the risk of the company being in a downtime, which means you might not be able to access your files in a critical time of need.

In my opinion, if you have a good internet line with high upload/download speeds, then the advantages of online backup outweigh the disadvantages of it. In the disadvantages I've listed above, the biggest one would be the upload or the download process taking too long because of a slow internet line.

All in all, I would prefer online backup compared to local backup any day of the year, especially because of the fact that I can reach my files anywhere I want, and I'm sure this is the biggest advantage of this method for anyone. Real-time backup is also another good feature, especially for someone like me who experiences lots of power outages.

I hope you enjoyed the read!

Sunday 9 September 2012

0 How to make a hard drive backup

Hello there! After a long time, I will be talking about making a hard drive backup, which is essential for many people, (including myself) as everyone knows how bad it would be to lose your important work files or anything important in that sense. Backing your hard drive is up is a simple thing and it can be done in many ways with many different softwares. I will show you a few methods to walk through this simple process.

First things first, you will need another hard drive that you can store the backup on, since the whole point of making a hard drive backup is the fact that if your primary hard drive is unreachable, you can access your files via the second hard drive.

First way to do this is a fairly simple, and orthodox way. A copying script will do just fine if you aren't looking for anything fancy, and it works pretty well. All you need to do is to open a Notepad up and copy these lines:


cd X:\
xcopy X: Y:\backupbatch /s /e /t /h /D

Where X: is the hard drive you want to back up from (for ordinary users, usually C:), and Y is the destination hard drive where you will be forming your hard drive backup. Now save the notepad file as a .bat (your file name should be backupbatch according to this example), which will make this a batch file which you can run at will. Whenever you run the batch file, the computer will copy all the files you have from X to Y. You might say the process will take too long to do this every time, but I got good news for you! The /D switch enables the script to only copy the files which have been changed, so it won't copy everything all over if they are untouched. You can even automate this process with a software called Xecutor. What it does is, in simple words, running your script every time before you shut your computer down. You can also use the scheduling software of Windows to customize the timing closer to your liking. (I won't go into detail)

The second way of doing this would be to use a commercial software which are commonly used by most people who want to make a hard drive backup. I would suggest Paragon Backup & Recovery which you can find here, as it is the most complete of the backup programs I've used. The software comes with many features which makes life easy for you when you want to make a hard drive backup.

Using this software is pretty straight forward, all you need to do is to run the program, go to the Backup & Recovery menu, and click Smart Backup. After that, click Disk or Partitions in the menu which comes up, choose the partition(s) you want to back up, select where you will save your back up (local drive is what you should be going for if you have another hard drive), choose where the archive will be saved, and decide the time for the back up to start.

To use the back up file you made, click the restore option this time, and choose the archive you made earlier. Follow the steps and you will have your back up restored in a matter of minutes!

These, in my opinion, are the simplest ways to make a hard drive backup. The sole difference between these two methods are the fact that the first method uses the simple principle of copying and pasting files to another hard drive, while the second method creates an image file where your files are kept in (less chance than first method for your files to be infected in a case of a virus). Also, if you are planning to keep your whole Operating System intact and ready to use, I recommend to use the second method. The first method is only good to keep your important files.


I hope you all enjoyed the read and learnt how to make a hard drive backup successfully! I wouldn't want you to lose your important files by accident and I'm sure that you wouldn't either. Thanks for reading!

Sunday 2 September 2012

1 Solid State Drive and its advantages

Storage devices are very important for a computer system. Usually a hard disk drive is used as the main storage device. Hard Disk Drive is also called as HDD and Solid State Drive as SSD. Both of these storage devices are non-volatile. That means data will be there, even the power is turned off. The solid state drives are comparatively newer than the hard disk drives; hence, they are expensive. Solid state storage have many advantages over the hard drive storage.

It will be helpful for the readers, if the components of the devices are stated here. An HDD has several moving parts including the spindle, which holds flat circular disks, read-write heads, and rotating motors. Here, one motor is used to spin the disks and one motor is used to move the read-write heads. In a solid state drive, there is no moving part. An SSD has three basic components including capacitor, cache, and controller. Almost all the smaller computing devices like smart-phones and tablet computers use solid state storage.

Many of the laptop computers are coming with SSDs. There are also desktop PCs, which are using SSDs. The first advantage of an SSD is that it is lighter than an HDD, as there are no rotating parts like motor, spindle or disks. Another important advantage of a solid state drive over a hard disk drive is that it consumes lesser electricity. An HDD need more power to drive the disks and move the heads. As SSDs do not have any moving parts, virtually they do not produce heat or noise.

Solid state storage is more reliable than hard disk storage. The motions of the heads and disks increase the chances of head crash. This can be happened for these reasons – sudden power failure, electronic failure, wear and tear, physical shock, poorly manufactured heads and platters, or corrosion. SSDs are more reliable for another reason. When an HDD comes close to powerful magnets, it may lose data, but an SSD is out of the risk of magnetic distortion.

A computer with an SSD is faster than a computer with an HDD. According to Intel, SSDs are eight times faster when compared to HDDs. To keep the HDDs in fast performance, defragmentation is needed; otherwise, the speed will slow down. Defragmentation is not needed for an SSD. If you can bear extra prices for SSDs, then you can enjoy all of these advantages. However, in future SSDs will be available at lower prices. Another limitation of solid state drives is their capacity. A 1TB SSD is very expensive and rare, whereas you can get an HDD with the same capacity almost in every computer-shop.

You will achieve more benefits when you will use solid state storage in your computer. Nowadays, there are many online storage services. Hence, you need not a storage device with huge capacity; you just need to maintain the storage device effectively. Use solid state storage in your computer and enjoy faster boot up and noiseless performance. As an SSD has longer life than an HDD, maintenance cost will be lesser if you use an SSD.

Sunday 26 August 2012

1 Why should you choose Windows 7 computer operating system?

Modern hardware and software are coming to meet the future needs. If you want to discover yourself in the latest software and hardware world, you should think to shift to Windows 7 from your existing system. It will need extra money, extra RAM, extra memory to install this operating system on your computer. Your computer will be ready to face the upcoming software and hardware versions.

windows 7 logo


A new thing comes with many possibilities; people can go with that new thing if it is reliable. Windows 7 is one of the latest operating systems from Windows. It has come with a number of promises. It supports almost all the modern computing technologies. The computer users who have become bore with the XP, they will certainly enjoy the new look and new features of this new operating system. The users of Vista who are not satisfied with its features and functionality will also enjoy this new version of Windows.

According to many users, Vista was a great mistake of Microsoft. Vista is chunky, it is slow, it unresponsive in many cases. Most of the users who were using Vista have upgraded their computers to Windows 7 operating system. One of the most attractive features of this new operating system is that it boots faster than any of its older versions since the 3.1. It needs almost same hardware support as Vista. If your computer has the configuration to install Vista, then you need not to buy a new one to use this new operating system.

After using this new operating system for several weeks, you will feel its advantages over other operating systems. You can run it on your Netbook comfortably. If you are worried about that, all of your past software will be useless in Windows 7; then you should know that if the programs run on XP, they would also run on this operating system. The enterprise or the ultimate version supports virtualization. If you were using Vista on your computer, then you can upgrade it to 7 comfortably. It is not so easy in Windows XP. You may need a third party support or a fresh installation.

The future versions of the most popular office management application programs MS Office 2013 will not run on Windows XP. There are also many other programs which may not run on Windows XP. Hence, to use all of these programs on your computer enrich it with the 7 operating system. Considering all the reasons stated above you can think to use this new operating system on your computer.

There are also some issues; if they are in your computer, you should not use the 7 version of Microsoft Windows operating system. If your computer does not have enough hardware support, you should not go for Windows 7. Another simple reason is that it is expensive. Why will you spend several hundred dollars if you can do all the tasks on your XP operating system? In many cases, to fix different issues it may need rebooting.

So, why do you wait? Switch to Windows 7 already if you haven't!

Sunday 19 August 2012

0 HP Officejet Pro 8600 Plus Review

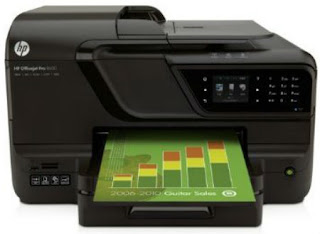
Today, I will be talking about HP Officejet Pro 8600 Plus printer, the prodigy of all in one printers (at least in my eyes!) at the moment. May it be performance, design, or price, HP doesn't disappoint us once again.

hp officejet pro 8600 plus

Let's start with what everyone would like to know first before buying anything, which is the price of this printer. The price varies depending on where you want to buy it, but if we are to name a common price, the printer is 300$ based on Newegg's prices. Some may say 300$ is expensive for a printer, but just wait until you see what it has to offer.

First of all, the printer supports AirPrint which is kind of a popular thing in our day with the iOS devices taking over the world slowly. For those who don't know, AirPrint is a feature which lets you print documents from your iOS device wirelessly provided that you are in the same network as your printer.

Another interesting feature is the ePrint feature which is something HP came up with. You can assign an e-mail address to the printer and send documents to be printed with email from any device connected to the same network as the printer. The downside is that you can't directly print Web pages, but many people will find a workaround for this easily.

The 8600 comes with a 4.3 inch touchscreen where you can choose to print, copy, scan, or fax in an easy fashion. The screen requires you to press the buttons harder than just giving a touch, which saves you from the trouble of touching the wrong button time to time. Besides the standard functions, there are also applications which you can access by using the touchscreen, such as Yahoo, Reuters, Disney and many more. You can download documents, templates, coloring pages and relative things directly from the printer without using an extra device.

hp officejet pro 8600 plus screen


The Officejet Pro 8700 Plus also has the feature to connect to the network via Wireless or Ethernet, which saves you from the trouble of buying an extra USB cable to connect it to your computer. The wireless/ethernet detection is fairly easy and straight forward, since it doesn't require any software to be installed on any computer, both on Mac and PC.

The speed of printing is quite good, especially compared to many other printers. Approximately, the 8600 prints a black text page in 5 seconds, a page with color graphics in 12 seconds, a photo in 40 seconds, and a presentation in 10 seconds. What catches the eye is that the photo printing speed is a bit slow in terms of comparison, but then again it's only a few seconds which doesn't really have an impact in daily life terms.

The scanner/copier is 8.5x14 inches, with a resolution of 4800 dpi. That means you can scan pretty much anything you need without losing any quality at all. You can save your scans to a memory card, to network, to e-mail, or most commonly, to your computer. An interesting mechanical addition is that the machine can flip pages for double-sided documents.

All in all, if you need a printer with many functions and a high quality document and photo printing feature for a good price, then the Officejet Pro 8000 Plus is for you. The printer comes with absolutely no down-sides (some might say the price is a bit too high like mentioned, and maybe the large size can be considered as a down-side for some people) in my opinion, and I highly recommend it for those who look for a professional printer. 


Wednesday 15 August 2012

0 Printing documents via wireless with your iOS device

Hello! Today, I'll tell you how you can print documents with your iOS device wirelessly. There are two methods to do this depending on your printer, (if it supports AirPrint or not) and we will be talking about both of them, so don't worry.

ipad printer


First of all, let's check if our printer is AirPrint supported by going to Apple Support here. If your printer is in the list, then what you have to do is fairly easy. All you have to do is to connect your iOS device and the computer which is connected to the printer on the same wireless network. After that, simply browse to the document you want to print, tap the Print button, select the printer in the list and print your document!

ios printer menu

If your printer isn't AirPrint compatible, then it will take a bit longer to set it up, but it works either way. Download FingerPrint here. (both for Windows and Mac) Install the software and run it. The software has a free trial but it leaves a watermark on the printed documents so if you want to get rid of the watermark, just buy the license (20$), it's totally worth it rather than buying a new printer.

Next thing, you're supposed to check your printer in the list. That way, FingerPrint will let the printer be recognized by iOS devices in the network.

fingerprint airprint software


Rest is pretty straight forward, keep your computer and FingerPrint running, connect your iOS device and your computer to the same network, tap the print button, choose the printer you want to use and print! Note the speed depends on your wireless connection, so if the connection is unstable it might cause interruptions or slow printing.

Now you have everything set up, you can print whatever you want from your iOS device. You can print your Notes, a Safari page that you might be interested in, your photos, the screenshots you took, your iWork files and many more!

I hope you found this useful and enjoyable!


Sunday 12 August 2012

0 Elgato Video Capture, Copy your VHS tapes to your computer

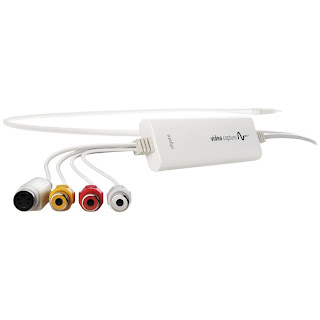
Hello! Today I'll be talking about something that I never thought would be possible, and was quite surprised when I saw the tool on the internet. Basically, it's a VCR to USB adapter which allows you to record the videos on the VHS tape to your computer.

elgato video capture adapter
This small tool here, which allows you to connect your VCR to your computer, also comes with a software for the recording process that I talked about. The adapter is compatible for Mac and PC, and it comes with a price of 75$, which I think is fairly good if you are willing to record some nostalgic tapes that you don't even have the opportunity to see anymore. (I doubt anyone has their VCRs hooked up nowadays) You can check the adapter out @ Amazon here.

elgato video capture screenshot

The process for recording the video from VHS to computer is rather simple. All you have to do is hook the VCR with the computer using the adapter, install the software on your computer and run it, and turn your VCR on. After that, simply go through the software and check if the video/audio is okay, and if it is, press the Start Recording button. Note that the video will be 'recorded', not 'saved', so however long the video you want to record is, you have to leave the software open for that long and wait until it's recorded. After you're done, hit the stop recording button and the software will allow you to trim the parts you don't want to have.

elgato video capture recording


After the recording part is done, you can save the file as mp4 (iTunes ready, you can copy your video over to your iPhone or somewhere similar) to anywhere, and also upload it to YouTube by using the software if you wish. Congratulations, you just got the video on a VHS tape on your computer!

I hope you enjoyed the read!

Friday 10 August 2012

0 5 Must Have Extensions for Firefox

Hello there! Today, I'm delivering you a list of extensions which you must have if you are using Firefox. Without these extensions, you're surely missing out on what Firefox completely has to offer.

Firefox Logo


1) FastestFox : FastestFox is possibly the best overall extension you can have for Firefox. It comes with many features such as endless pages, (when you scroll down in Google, you don't have to click next page anymore, it comes automatically) qLauncher (When you tap Ctrl + Space, it gives you a list of sites which can quickly access to much like speed dial in a phone), information about highlighted text (when you highlight a text, you get options such as searching that text in Wikipedia etc.) and many more things such as fast copying & pasting. With FastestFox, you gain a lot of extra time since it gives you shortcuts for nearly anything.

Fastestfox quick view


2) DownThemAll! : An integrated download manager for Firefox which allows you to pause & resume downloads, accelerates them compared to Firefox's default downloader, and gives you the option to download every single image and link on a webpage just with one click if you wish. (which I think is the most useful feature of this extension) A must have in everyone's Firefox kit, even if you aren't too much into downloading. You never know if you one day decide to save all pictures on a website or something similar.


3) StumbleUpon : Rather than a useful tool like the others listed, this one is rather to have fun. It's the extension for the website www.stumbleupon.com (Where you get a random website to check if you click the Stumble button for those who aren't familiar), where you can start "Stumbling" without going to the website. (provided that you are logged in) As a dedicated stumbler, I keep this extension in my Firefox arsenal.

Stumbleupon toolbar


4) Web Developer : Web developers know how much this tool means to them, but even if you aren't a web developer, this extension comes with pretty handy stuff to speed your Firefox experience up. It allows you to disable many things in a quick fashion such as your cache, JavaScript, Java, proxies, page colors, cookies, images, and many more things that you don't want to use at that particular time. With this tool, you won't have to disable the things from Firefox options just for one time and waste your time with this cycle of disabling and re-enabling.

Web Developer for Firefox

5) Copy Plain Text 2 : For all the regular copy pasters out there, don't you hate it when you need to copy something in your document and it comes with all the fancy background colors, bold texts and stuff like that? Well, Copy Plain Text 2 is your friend on this one. Simply click "Copy as Plain Text" when you are about to copy something (if you have the extension of course), and this handy little tool with get rid of the things that you don't want to see in your document when you copy!


Thursday 9 August 2012

0 Corsair Force GS 240 GB Review & Comparison

The Corsair Force GS which was announced a month ago is surely the king of SSDs with the speed it offers compared to the other SSDs when we look at the technical data. If we were to compare numbers, Corsair Force GS is the fastest SSD in the market, leaving its rivals like OCX Vertex, SanDisk Extreme, and Intel SSD 520 behind.

The drive comes in 180 GB, 240 GB, 360 GB, and 480 GB models, for 175$, 220$, 300$, 430$ respectively, which is a fairly decent price for a SSD of its caliber. For this review, we will be looking at the 240 GB Corsair Force GS, and 240 GB models of other hard drives to compare. (prices may vary)
Corsair Force GS 240 GB
Let's take a quick look at the drive's technical statistics compared to the other hard drives. (For 240 GB)

The drive uses the LSI SandForce SF-2281 controller, which is the same as the Sandisk Extreme and the Intel SSD 520. In the other corner, the Vertex 4 stands with the Indilinx Everest 2 controller, the only different controller between these drives.

The Force GS offers a Max Sequential Read Performance of 555MB/s, Write Performance of 525MB/s and a Max Random Write performance of 90.000 IOPS. (240GB - 220$)

For OCZ Vertex 4, the values are 535MB/s, 475MB, 95.000 IOPS. (256GB - 220$)

For Sandisk Extreme, 550MB/s, 510MB/s, 83.000 IOPS. (240GB - 187$)

For Intel SSD 520, 550MB/s, 520MB/s, 80.000 IOPS. (240GB - 255$)

As we can see, the Corsair outperforms both of the hard drives in terms of writing and reading speeds when we compare the numbers.

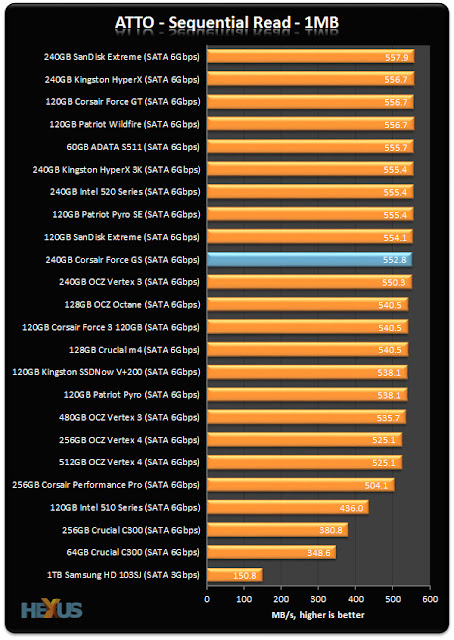
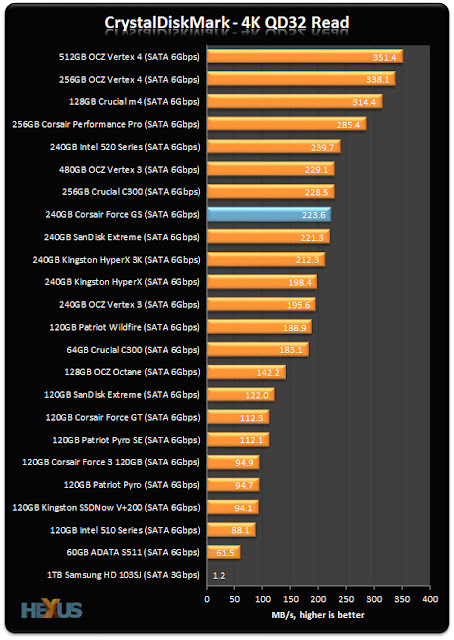
Though, sadly, things don't look the same way when we look at the benchmarks. (Taken from Hexus)

Corsair Force GS sequential read

On Sequential Read, we see the Corsair Force GS is not performing well, and is beaten by all hard drives which we have compared earlier except the Vertex 4.

Corsair Force GS sequential write

 In the category of Sequential Write, we see the Corsair nearly living up to its promise by passing both Vertex 4 and Intel 520, though getting beaten by Sandisk Extreme by a small value even though the statistics show that Corsair should've been superior.

Corsair Force GS random write

On Random Writing (IOPS), even though the Corsair offers more than the 520 and the Extreme, all three hard drives combined with the Vertex 4 standing on 95.000 IOPS passing right through the Corsair.

Corsair Force GS random read

We see a similar scenario in Random Reading, again the Corsair isn't living up to the statistics we have seen when it first came out.


All in all, it would be wrong to say that the Corsair Force GS is a bad SSD , but it's definitely not the king of SSDs, even with the high values it shows compared to the other SSDs in terms of statistics. Personally, I've been disappointed when I saw the benchmarks since I was quite hopeful about Corsair Force GS, and I was even thinking of buying one. Looks like it's not the best time for that right now. (it's the newest among the drives we compared)

In this situation, I will have to recommend the Sandisk Extreme if anyone's interested in buying a SSD, performing quite well in all benchmarks, coming in with an extra 15 GB and the lowest price of them all. Sorry Corsair, but my vote goes to Sandisk this time. The Intel 520 is also a quite strong alternative for those who want to buy a SSD, but it's fairly overpriced for the so little benefit it gives. If you are someone who wants to push the limits of the system to the max, then Intel 520 is more suitable for you than the Sandisk Extreme. A regular user (including gamers) should prefer the Extreme. 

Even though it's not related to the Corsair in a specific way, I want to mention that as a matter of fact, we also see the SandForce performing better than the Everest 2 when it comes to Sequential R/W, and vice versa for Random R/W. That means, for big file transfers, the SandForce will outperform the Everest 2 while the Everest 2 will be outshining the SandForce when it comes to clusters of small files. The SandForce also seems to be more popular among SSDs, but it's hard to say which one is better than the other which such close comparisons. Looks like SandForce 2281 vs Everest 2 will be the new nVidia vs Radeon!


Wednesday 8 August 2012

0 Gyazo, for those who take lots of screenshots


Today I'm going to introduce you to Gyazo, the fastest screenshot capturing and uploading software.


Those who take lots of screenshots would know, it has always been lots of work to take the screenshot, then copy it to Paint, then save it, and then upload it to some place so you can link it. Well, those days are over with Gyazo. All you have to do is download the Gyazo software here.

After you download it, just run it, and it will let you select the space you want to capture on your screen.


After you select the space, wait a few seconds and your screenshot will be ready. Your link will be generated in your favourite browser and then you can link it to wherever or whoever you want to!

You can also view your screenshot history in the website provided that you didn't delete your cache. If you want to be able to check your screenshots on other computers as well, you can sign up for Gyazo Pro. It's only 2$ a month and I think it's well worth it. That way, you can keep your screenshots forever, and you can see them wherever you go.

Tuesday 7 August 2012

0 Faxzero, send fax messages from your computer in an easy way

Many times I needed to send an urgent fax to somewhere, it always ended up with my fax machine not operating properly or me not finding a fax machine at the location I am at all. For all those who are experiencing the same problem, Faxzero is the cure.

All you have to do is to go to Faxzero website, fill in the information, attach the files you want to fax, and you're done. Also, it's free unless you are planning to send too many faxes, so it's a great solution if you need to fax a one page document or something in that fashion.


If you're planning to send more pages, Faxzero offers you to send 15 pages of fax for 1.99$.

Personally, I find this tool very useful since I tend to end up in situations where e-mail is not accepted, but only fax is. Even though fax is sort of an old technology now, it's still being used in many businesses.

Monday 6 August 2012

0 Flux, an interesting piece of software.

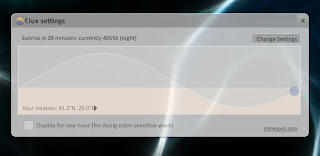
Flux (or f.lux) is a software which changes the color of your screen according to the time in the location you are. That way, your screen doesn't look abruptly bright when it's night time.

I personally thought it's really interesting since I actually started to like that the colors aren't as bright as they are in the morning when it's night time. This way, it doesn't feel like someone is holding a flashlight right on my face when I get back on my computer at night time.

Flux software main window

By clicking Change Settings, you can change your location so that f.lux adjusts itself to change the color when it's the right time. You can also change the intensity of the color for both day and night time in the way you like it to be. Once you get used to how you look at your screen with f.lux at night, try closing it and seeing the difference. Personally, I feel like I'm going blind when I turn f.lux off after using it for a few days now.

Flux software configuration

Graphic designers, don't be afraid of using this software thinking that your colors will be off when the f.lux filter is gone, since you can disable f.lux for one hour with a simple click, and get the colors back to normal for the time you are working on your project.

All in all, it's a pretty interesting and a fun software that everyone should give a try. It's available for Windows, Mac, Linux and iPhone/iPad at the moment. You can download f.lux here.

Sunday 5 August 2012

0 Speeding your Windows 7 boot time up!

Tired of waiting years every time you start your Windows 7 up? You hate restarting your computer just because it takes so long to start it back every time? Well then, this post is for you!

As a person who hates long boot times, I decided to write about how you can speed your Windows 7 up today, let's go!

1) Configure your Windows 7 to use all cores. 

To do this, hit WinKey + R, and type msconfig in the box which comes up. Switch to the Boot tab, select your Windows 7 installation and click Advanced Options. Check Number of processors and max it out.
You can aslo check "No GUI boot" option as it slows down the boot time around 2-3 seconds. (No more colorful Windows 7 boot though.)


2) Eliminate unecessary executables from your Startup.

To do this, open up msconfig like you did at the last step, and pick the Startup tab this time. Check off everything that you don't want to start when your computer does. You can open them up manually when you need to use them. This will save you a lot of time when your Windows is loading up after you log in your user.


3) Eliminate unnecessary Services from your Startup.

The drill is the same as you might've though, just go to msconfig and select the Services tab this time. If you aren't so familiar with your operating system, I suggest checking Hide all Microsoft services before you disabling stuff as you can screw something up in your system.


4) Remove the fonts you aren't using.

Especially if you downloaded lots of Fonts back in the day for some reason, and you aren't using them at all, go to Control Panel -> Fonts and delete the fonts you don't need as Windows loads every single Font when you start it up. This is a tip which will save you a lot of time as well.


5) Disk Cleanup, Disk Scan, Disk Defragment

It's always good to keep your system hard drive tidy and clear since you'll be saving it from extra load by doing that. Go to Computer, right click your system hard drive, click Properties. In the Tools section, start with Error-checking. Check both options and start it off. After that, go to General and hit Disk Cleanup, get rid of the unused files. Lastly, go back to Tools and defragment. Defragment is the most effective tool among these 3 since it will cluster your files, opening up more space in your hard drive and giving you some extra speed.


These are all the things you can do without getting into any sort of hassle and without altering the way you use your Windows. There are a few extra things you can do if you think it's worth it, but I really think there's no need for the extras as what I listed above will be sufficient.

For the ones who want to take look at the extras:

0) Disable Windows Aero. (It's definitely not worth it to disable a feature like this just to gain a few seconds of time in my opinion!)
1) Add up more RAM. Adding RAM will increase your boot time if you don't have sufficient RAM at the moment.
2) Get a SSD. A SSD will perform better than any 7200 RPM hard drive or a 15K SCSI.
3) Delete/switch your Anti-Virus software if you think this is the cause you are having a slow boot. (Some Anti-Virus softwares take too long to load up etc.)
4) Go to BIOS and enable Quick Boot, also assign your hard drive as the First Boot Device instead of an Optical Drive, it will make you gain an extra 3-5 seconds.

All being said, these are the things you can do to speed your boot time up. From minimal tweaks to hardware changes, there are many things you can do to have a quicker boot. I hope you enjoyed the read!

Saturday 4 August 2012

0 RealVNC, a multi-platform remote access software

RealVNC, a multi-platform software which allows you to access computers anywhere in the world, given that they have VNC server installed and configured. It's a great tool for people who want to access their home computers from work or vice versa, or for people who need to administer different computers in the network in a workplace.

Setting up RealVNC is -really- simple. Download it here to start with.

In the setup, check VNC Server for the computers you want to be connected to, and VNC Viewer for the computers you want to connect from. (You can leave it as default, it would be just fine.)

After you install the software, you'll see a box popping up with the needed details to connect.


As we see in the picture, the IP we need to connect to this computer is 192.168.1.5 (given that we are in the same network of course) Now you can go to the other computer, run VNC Viewer, and put the IP address in.

After we put our IP address in, we can click Connect. This will bring up another window which will want us to type the Windows login username and password for the computer we are connecting to. (You can change this option in VNC Server options by right clicking the icon in the start menu, going to Options, and changing the Authentication mode to VNC password instead of Windows password, that way, you can choose a password that you are willing to use. (It's the only option in Free version.))


After you click OK, you will see the other computer's screen on your screen!


That means the connection is successful and you managed to get RealVNC work! This was easy of course, since everything was pretty much set up by itself. The case is different if you are willing to use RealVNC and you aren't on the same network with the other computers.

In this case, you are supposed to open the port 5900 (You can change this in options, but it's not really necessary unless you have something else running on that port) on your router first. If you don't know how to open the port on your router and forward it, I suggest you to go here, choose your router, and choose RealVNC. The steps are pretty simple and straight forward to follow.

After you do that, type the external IP (Learn it here!) of the computer you want to connect to into your VNC Viewer, and you are good to go! 


The free version of the software is limited for personal use, and it only allows you to remote control other computers. I believe file transfer was a tool which should have been included in the Free version as well, and I find a little illogical that it isn't, but oh well!

If you are looking to use this software in a commercial basis, you can try the Personal version and Buy it if you want to, which has advantages over the Free version such as chatting with the other computer, sharing printer, transfering files, 128-bit AES encryption and a higher performance rate.

There's also an Enterprise version which is for large workplaces. It comes with a deployment tool which allows you to install VNC Server from a central computer to the every computer in the network. It also comes with a 256-bit AES encryption compared to the Personal version's 128-bit.

RealVNC lets you try any of these versions for 30 days, so you can have full information on everything about this software before buying it. I personally recommend it as it is the best VNC software I've used compared to the other ones. Of course it comes with the downside of being have to pay for most of the extra features, but I believe it's worth it.


Friday 3 August 2012

0 CPU-Z & GPU-Z, CPU and graphics card overview software

CPU-Z and GPU-Z, two tools that every computer user should have no matter what since they give you a full overview of your CPU and GPU together. From clocks to temperature, these softwares give you every piece of information you need to know. CPU-Z also gives you the full information about your RAM if you ever need it.

CPU-Z and GPU-Z main window


Putting daily usage aside, they are great tools for overclockers since you can verify your data by checking the clock speeds on these softwares.

There isn't really much to say about these softwares as they are pretty straight forward, and they don't really give you the option of doing anything else other than showing you everything what's happening in your computer. (Be happy with that much!)

Maybe it's useless to mention this, but I have to say, these softwares take nearly no space at all as well, so you can feel free to install them on any computer you'd like to, you won't regret it.

I personally use both of these tools for years and I believe it's always handy to have small tools like this in your computer, so you can look up what's happening any time you want.

Click to download : GPU-Z | CPU-Z

Wednesday 1 August 2012

2 GeForce GTX 690 vs. GeForce GTX 680 SLI

In one corner, the fastest single GPU card in the markets at the moment which is priced 500$, and in the other corner, nVidia's dual GK104 core GTX 690, priced 1000$.

nVidia GTX 690 and GTX 680


It's the same price to buy either a 690, or a 680 SLI, but let's see which one performs better.

GTX 690 vs GTX 680 Chart

In the chart, we can see that GTX 690 is basically two GTX 680's on the same card. The core of 680 is doubled and placed on the 690. The only little difference between these two cards is that 690 has a higher GPU frequency as we can see above. Though, it's less power consuming to run a 690 than 680 SLI since 690 consumes a maximum of 300W power whereas 680 consumes 195W. Running SLI also means you'll need more cooling than running a single 690.

All being said, it's time to compare the performances of these cards. (Benchmarks taken from legitreviews.com)


As we see in the benchmarks, 680 SLI and 690 are very close to each other in every single one. It's no surprise to be honest, since both of the setups share nearly the exact values when we look at the charts. The difference between them isn't even close to be noticeable in a daily scenario. 

That being the case, I believe it would be more logical to buy a 690, since it's more open to upgrade when you have the money, (SLI 690) it's easy to cool, and it takes up less power. Even though the 680 SLI came in front in most of the benchmarks, we can see that the difference varies from 0.1 to 2 FPS maximum. Considering the advantages you get from buying a 690 compared to 680's small performance advantage, the good choice would be to buy a 690, especially if you are considering high resolutions. (2560x1600)

All in all, choosing either 680 SLI or 690 won't really make a difference at all, but you'd be saving some power and making an investment for the future by buying the 690.

Monday 30 July 2012

0 Synergy, Mouse and Keyboard Sharing Software

Synergy is a software which allows you to share your mouse and keyboard with another computers in your network.

Basically, you have to choose a computer which is the server (With the mouse & keyboard attached), and then connect the client computers to the server computer. This will allow you to use your mouse and keyboard on the client computers, simply by dragging your mouse over to the other screen as you would do with dual screens.

To do this, run Synergy on the computer which is the server, and check the Server option.

Synergy main window

Then, run Synergy on the client computer, and mark the Client option, it will ask you for the Name of the server.

Synergy main window

You can learn the name of the server by going to Edit -> Settings in the server computer. The name which goes by Screen name is the name of your Server which you need to fill in your client's Synergy.

Synergy settings

After you do this, go to Configure Server on your server, and position your client computers according to where they stand, so you can drag your mouse that way to shift your controls.

Synergy placement configuration

When you're done with this, you're good to go! First, click Apply on the main window of Synergy on your server computer, then click Apply on your client computer(s). 

You can tell Synergy to put itself in startup if you wish by going to Edit->Options and checking Automatically start server/client.

You don't need to run Synergy as a program every time you want to use it. It's a service which runs in the background unless you stop it, so it will be ready for use every time you start your computer if you check the option.

Personally, I use Synergy to chat with people on Skype on my laptop while I'm gaming on my main computer. It's really handy to use my own keyboard instead of reaching over to the laptop every time I want to type something to someone. I guess many people could make different uses for this piece of software.


Computer Repository 2012 |- Template created by O Pregador - |- Powered by Blogger Templates